domingo, 30 de septiembre de 2012

Truco:Abrir una dirección URL o un Programa con C++

Para abrir enlaces a través de un programa en c++ , se debe utiliza la función ShellExecute de la API de Windows.
Una sencilla aplicación que pregunte al usuario si desea visitar mi nuevo blog sería:
#include <windows.h>
#include <iostream>

using namespace std;
int main()
{
int val = MessageBox(NULL,"Quieres Visitar mi nuevo Blog?","Ventantita",MB_YESNO);
cout<<"Valor Retornado: "<<val;

if(val==6)
 {
        ShellExecute(NULL, "open", "http://www.elnaufragodelared.com/",NULL, NULL, SW_SHOWNORMAL);

 }
return 0;
}
De igual manera si deseo Ejecutar un programa externo como el Emule sería así:
#include <windows.h>
#include <iostream>
using namespace std;
int main()
{
        ShellExecute(NULL, "open", "C:/Archivos de programa/eMule/emule.exe",NULL, NULL, SW_SHOWNORMAL);
        return 0;
}

NOTA:
El ejemplo fue compilado utilizando el IDE , Codeblocks.

Uso de SET NOCOUNT en SQLServer

En SQLServer se usa SET NOCOUNT para devolver o no la cantidad de filas afectadas por alguna sentencia o transacción ejecutada. SET NOCOUNT tiene dos estados:
SET NOCOUNT ON : Inhabilita la cuenta del número de filas afectadas por una instrucción Transact-SQL
SET NOCOUNT OFF: Habilita la cuenta del número de filas afectadas por una instrucción Transact-SQL

Cuando se usa SET NOCOUNT ON se mejora el rendimiento del servidor porque omite la devolución del numero de filas afectadas al cliente o terminal que ha realizado la consulta, pero hay casos en que es necesario obtener el número de registros afectados segun nuestra necesidad, por ello se recomienda analizar muy bien cuando usar SET NOCOUNT ON.
El siguiente ejemplo hace una consulta a la tabla customers de la base de datos Northwind usando los dos estados de SET NOCOUNT, se puede apreciar la diferencia.
Usando SET NOCOUNT ON
SET NOCOUNT ON
 
select * from dbo.customers
where country = 'France'
GO

Usando SET NOCOUNT OFF


Usando delegados para intercambiar informacion entre ChildForms de un Parent Form en C#.NET

A menudo en aplicaciones MDI, necesitamos intercambiar informacion entre Child Forms que son instanciados por el mismo Parent Form. En tales casos, los delegados son un modo adecuado para intercambiar como.
En este programa tendremos un Form Padre y 2 Child Forms. Los forms hijos seran instanciados por el padre. El segundo form hijo va a interactuar con el primero a traves del Parent Form usando delegados. En este ejemplo mostraremos como usar delegados para realizar esta interaccion. Puedes utilizar las mismas tacticas para desarrollar otros tipos similares de procedimientos.
Lo que sea que el usuario escriba en el textbox del segundo formulario y luego de click en el boton Submit, ese texto sera mostrado en el label del primer formulario. Esta interaccion entre forms hijos es monitoreada y manejada por el form padre.
Para esto en el Form Padre colocamos 2 botones como la figura de arriba y cuando pulsemos el primer boton, instanciamos el primer form y el Parent Form creara un puntero a una funcion del formulario.
private void btnFirst_Click(object sender, EventArgs e)
        {
            frmFirstChild FrmFirst = new frmFirstChild();
            FrmFirst.MdiParent = this;
            FrmFirst.Show();
            FrmFirst.Activate();
            SayHello = FrmFirst.FuncDisplayMsg;
        }
Esto quiere decir, que el delegado SayHello del Parent Form mantiene un puntero al metodo del primer formulario. La declaracion del primer formulario es asi:
private delegate void DelSayHello(string Msg);
        private DelSayHello SayHello;
Y el metodo que sera llamado es(este metodo estara dentro del Primer Form):
public void FuncDisplayMsg(string Msg)
        {
            this.lblMsg.Text = Msg;
        }
Ahora el Form padre llamara a este metodo del primer Form Child cuando un metodo del segundo Child Form pase un valor al padre. Para hacer esto, el Parent Form tiene un metodo que sera llamado del segundo Child Form(via delegados). El metodo es:
private void InvokeFunc(string Msg)
        {
            if (SayHello != null)
                SayHello.Invoke(Msg);
        }
Ahora que pasara cuando el segundo Child Form sea instanciado?. El segundo Child Form tiene un delegado que tiene un puntero del metodo mencionado arriba. El codigo del evento click sera asi:
private void btnSecond_Click(object sender, EventArgs e)
        {
            frmSecondChild FrmSecond = new frmSecondChild();
            FrmSecond.MdiParent = this;
            FrmSecond.InvokeDel = this.InvokeFunc;
            FrmSecond.Show();
            FrmSecond.Activate();
        }
Y finalmente, cuando el usuario clickee en el boton Submit del segundo Child Form, el texto del textbox es pasado al Parent Form, el cual a cambio pasa el valor al primer Child Form y el texto es mostrado. Este sera el codigo del segundo Form:
public delegate void DelInvoke(string Msg);
        public DelInvoke InvokeDel;

        private void btnSubmit_Click(object sender, EventArgs e)
        {
            if (this.InvokeDel != null)
                InvokeDel.Invoke(this.txtMsg.Text);
        }

sábado, 29 de septiembre de 2012

Truco:LowerCase a UpperCase mientras escribimos en TextBox en ASP.NET con C#

Para darle una mejor vistocidad a nuestros proyectos web donde se necesitan escribir ciertos campos en mayusculas y mostrarlos al usuario en tiempo real.
Agregamos este codigo en el codigo .aspx:
<head runat="server">
    <title>Página sin título</title>
    <script type="text/javascript" src="http://ajax.microsoft.com/ajax/jQuery/jquery-1.4.1-vsdoc.js"></script>
    <script type="text/javascript">
        function changeToUpperCase(controlName) {
            document.getElementById(controlName).value = document.getElementById(controlName).value.toUpperCase();
        }

    </script>

</head>
<body>
    <form id="form1" runat="server">
    <div>

        <asp:TextBox ID="TextBox1" runat="server" onKeyPress="changeToUpperCase(this.id)"></asp:TextBox>

    </div>
    </form>
</body>

Mostrar texto de marca de agua en el campo password en ASP.NET

Para que salga el efecto que ven en la imagen en el codigo html de su sitio web agregan este codigo y listo =)
<head runat="server">
    <title>Página sin título</title>
    <script type="text/javascript" src="http://ajax.microsoft.com/ajax/jQuery/jquery-1.4.1-vsdoc.js"></script>
    <script type="text/javascript">

        $(document).ready(function () {

            $("#txtPasswordWaterMark").show();
            $("#txtPasswordWaterMark").addClass("waterMark");
            $("#txtPasswordWaterMark").val("Password");
            $("#<%= txtPassword.ClientID  %>").hide();

            $("#txtPasswordWaterMark").focus(function () {
                $(this).hide();
                $("#<%= txtPassword.ClientID  %>").show();
                $("#<%= txtPassword.ClientID  %>").focus();
            });

//            $("#txtPasswordWaterMark").keydown(function () {
//                $(this).hide();
//                $("#<%= txtPassword.ClientID  %>").show();
//                $("#<%= txtPassword.ClientID  %>").focus();
//            });

            $("#<%= txtPassword.ClientID  %>").blur(function () {

                if ($(this).val() == "") {
                    $("#<%= txtPassword.ClientID  %>").hide();
                    $("#txtPasswordWaterMark").show();
                }

            });

        });

    </script>
    <style type="text/css">

      .waterMark{
            color : #9B9B9B;
        }

    </style>
</head>
<body>
    <form id="form1" runat="server">
    <div>
    <asp:TextBox ID="txtPassword" TextMode="Password" runat="server"></asp:TextBox>
     <input type="text" id="txtPasswordWaterMark" />
    </div>
    </form>
</body>

Como ver imagen previa antes de guardarlo en Base de Datos en ASP.NET

Para este ejemplo agregamos un control tipo FileUpload, un boton de vista previa que al pulsarlo nos muestre la imagen y un textbox que extraera el nombre de la imagen
Este sera el codigo .aspx
<body>
    <form id="form1" runat="server">
    <div>
    
        <asp:FileUpload ID="FileUpload1" runat="server" />
        <asp:Button ID="Button1" runat="server" onclick="Button1_Click" 
            Text="Vista Previa" />
        <br />
        <asp:Button ID="Button2" runat="server" Text="Nombre de Archivo" />
        <asp:TextBox ID="TextBox1" runat="server"></asp:TextBox>
        <asp:Image ID="Image1" runat="server" />
    </div>
    </form>
</body>
Y este codigo sera del lado del servidor
Code Behind :
string imgname;
    protected void Page_Load(object sender, EventArgs e)
    {

    }
    protected void Button1_Click(object sender, EventArgs e)
    {
        string L_path = "No Images";
        imgname = FileUpload1.FileName;
        TextBox1.Text = imgname;

        // break the pathe, collect file type then match.
        string filetype;
        filetype = System.IO.Path.GetExtension(FileUpload1.PostedFile.FileName);
        if (filetype.ToLower().Contains(".jpg")  ||  filetype.ToLower().Contains(".jpeg") || filetype.ToLower().Contains(".bmp") || filetype.ToLower().Contains(".png"))
        {

            ClientScript.RegisterStartupScript(typeof(string), "You choosen the file in wrong formated.. !!!", "");

        }
        if (FileUpload1.PostedFile.ContentLength > 5242880) // byte size
        {
            Page.ClientScript.RegisterStartupScript(Type.GetType("System.String"), "addScript", "alert('Image Size is should be Less Than 5 MB' )", true);

        }
        if (FileUpload1.HasFile)
        {
            L_path = Server.MapPath("~/Images/").ToString();
            L_path += imgname;
            FileUpload1.SaveAs(L_path); // Temporary saved 

        }
        else
        {
            Page.ClientScript.RegisterStartupScript(Type.GetType("System.String"), "addScript", "alert('No Image is Selected..)", true);

        }
        Image1.ImageUrl = "~/Images/" + imgname;

        Page.ClientScript.RegisterStartupScript(Type.GetType("System.String"), "addScript", "alert('Image is Reflected..Plz Save it)", true);

        // After saving into Database delete current file from Application.
    }

Como loguearse en un WebSite sin Base de Datos en ASP.NET

En este ejemplo estoy usando un archivo .txt para almacenar las credenciales del login con separador de barra (|). Este archivo estara dentro de tu aplicacion. En este ejemplo nos loguearemos sin utilizar Base de Datos.
Usuario y password del archivo: sa|123
Nombre del txt: LoginCredentials.txt
El codigo de la aprte html sera el siguiente:
<body>
    <form id="form1" runat="server">
    <div>
    
        <asp:Label ID="Label1" runat="server" Text="Usuario"></asp:Label>
        <asp:TextBox ID="TextBox1" runat="server"></asp:TextBox>
        <br />
        <asp:Label ID="Label2" runat="server" Text="Password"></asp:Label>
        <asp:TextBox ID="TextBox2" runat="server"></asp:TextBox>
        
        <br />
        <asp:Button ID="Button1" runat="server" Text="Login" onclick="Button1_Click" />
        
    </div>
    </form>
</body>
El codigo del lado del servidor sera este:
String contents;
    System.IO.StreamReader sr;
    static int count;
    protected void Page_Load(object sender, EventArgs e)
    {
        count = 0;
    }
    protected void Button1_Click(object sender, EventArgs e)
    {
        if (System.IO.File.Exists(Server.MapPath("LoginCredentials.txt")))
        {
            string FILENAME = Server.MapPath("LoginCredentials.txt");
            sr = System.IO.File.OpenText(FILENAME);
            contents = sr.ReadToEnd();
            if (contents.IndexOf(TextBox1.Text.Trim()) > -1)
            {
                count = count + 1;
            }
            if (contents.IndexOf(TextBox2.Text.Trim()) > -1 && count == 1)
            {

                Page.ClientScript.RegisterStartupScript(Type.GetType("System.String"), "addScript", "alert('Login Successfully..... ')", true);
            }
            else
            {
                Page.ClientScript.RegisterStartupScript(Type.GetType("System.String"), "addScript", "alert('Login Invalid...')", true);
            }
        }
    }
Si se loguean con el usuario sa y password 123 les saldra este mensaje:

Reescribiendo metodos de URL en ASP.NET

En este proyecto web lo que haremos sera mostrar una lista de artistas y al seleccionar uno se muestra en la URL y se carga otra pagina:

Primero descargamos el componente URL Rewriter .NET aqui:http://www.dotnetdevelopment.net/tutorials/URLRewriterCompiled.zip Volvemos a nuestro proyecto y vamos a la opcion agregar referencia:
Una vez aqui agregamos la dl

Una vez aqui agregamos la dll que descargamos(Intelligencia.UrlRewriter.dll).
Ahora en el proyecto crearemos una pagina aspx llamada Music.aspx.
Ahora en el Web.config agregamos la siguiente linea debajo del configSection
<section name="rewriter" requirePermission="false" type="Intelligencia.UrlRewriter.Configuration.RewriterConfigurationSectionHandler, Intelligencia.UrlRewriter"/>
Ahora agregamos esta linea justo abajo de httpModules
<add type="Intelligencia.UrlRewriter.RewriterHttpModule, Intelligencia.UrlRewriter" name="UrlRewriter" />
Ahora la pagina Default.aspx se vera asi:
El codigo de la pagina sera el siguiente
<head runat="server">
    <title></title>
</head>
<body>
    <form id="form1" runat="server">
    <div>
       <h1>Music Page</h1>
        
        <p>Select your favorite artist below.</p>
        
        <ul>
            <li><a href="music.aspx?artist=Beatles">Beatles</a></li>
            <li><a href="music.aspx?artist=Led Zeppelin">Led Zeppelin</a></li>
            <li><a href="music.aspx?artist=Rolling Stones">Rolling Stones</a></li>
        </ul>
    </div>
    </form>
</body>
Como se ve las rutas URL son estructuras URL relativas. Lo que queremos es reescribir la URL original y que se vea asi:

music.aspx?artist=Beatles
music.aspx?artist=Led Zeppelin
music.aspx?artist=Rolling Stones
en la segunda pagina llamada music.aspx se vera asi:
el codigo sera el siguiente:
<head runat="server">
    <title></title>
</head>
<body>
    <form id="form1" runat="server">
    <div>
    You are visiting the <font color=maroon><b><asp:Label ID="Label1" runat="server" Text="Label"></asp:Label></b></font> page. Thank you.
    </div>
    </form>
</body>
nuestro codigo en el Load de la pagina sera este
.vb
'Get query string value
        Dim querystring_value As String = Request.QueryString("artist")
        'Display the retrieve artist value to the page
        Label1.Text = querystring_value.ToUpper()
espero les haya servido el ejemplo.

Reescribir URLs en ASP.NET con URLRewriter.NET

Reescribir URL's tiene muchos beneficios, listare los principales:
  1. Apariencia SEO amigable

  2. URLs seguras

  3. No necesitamos cambiar el bookmark con cambios en su estructura

Antes de reescribir la URL my URL se veia asi: http://localhost:2661/URLRewrite2/DynamicPage.aspx?MyTitleId=1 Despues de reescribir la URL la URL se ve asi http://localhost:2661/URLRewrite2/Article/Asp-Net-website-paths-1.aspx Vamos a reescribir la URL con un simple ejemplo Este sitio web mostrara una lista de articulos en un GridView y al seleccionar uno de ellos, mostrara dinamicamente el contenido del articulo generado. Antes de reescribir la URL cuando tu pongas el mouse sobre el primer link del articulo "ASP.NET Ruta del Website" usamos el query string para mostrar el contenido del articulo.
La pagina dinamica muestra el QueryString, antes de reescribir la URL.
Despues de reescribir la URL lograremos una URL amigable la cual nos mostrara el contenido de los articulos.
Para este ejemplo crearemos una base de datos llamada Articletable. Despues crearemos una tabla llamada Articletable la cual tendra los campos ID, titulo, descripcion y nombre de autor. El titulo del link sera creado en el control GridView de ASP.NET. Cuando demos click en el titulo del link nos redigira a la pagina dinamica. El script para crear la tabla sera el siguiente:
CREATE TABLE [dbo].[Articletable](
      [ID] [int] NOT NULL,
      [Title] [varchar](200) NULL,
      [Description] [varchar](400) NULL,
      [Author] [varchar](50) NULL
)
Insertamos datos en esta tabla
INSERT INTO Articletable VALUES(1,'How to validate dropdownlist in asp.net','Here, we will learn how to validate a DropDownList in ASP.NET.','Rohatash Kumar');
GO
INSERT INTO Articletable VALUES(2,'Introduction to .NET Assemblies in VB.NET',' Here is a comprehensive introduction to .NET assemblies.','sunil Kumar');
go
INSERT INTO Articletable VALUES(3,'BinaryReader and BinaryWriter classes in VB.NET','In this article I will explain about BinaryReader and BinaryWriter Classes in VB.NET.','Deepak Kumar');
 
go
INSERT INTO Articletable VALUES(4,'StreamWriter class in VB.NET','This article shows how to create a new text file and write a string to it.','Rohatash Kumar');
go
Ahora en ASP.NET Paso 1: Descargamos los archivos binarios para URLRewriter.NET(Inteligencia.URLRewriter.dll) Paso 2: Agregamos una referencia a esos archivos binarios, damos click derecho y agregamos referencia.
Paso 3: Creamos 2 paginas .aspx llamadas Default.aspx y DynamicPage.aspx Paso 4: Actualizamos el archivo Web.config para hacer que el URLRewriter funcione.
<configuration>

<configSections>
<section name="rewriter"
requirePermission="false"
type="Intelligencia.UrlRewriter.Configuration.RewriterConfigurationSectionHandler, Intelligencia.UrlRewriter" />
</configSections>

<system.web>

<httpModules>
<add name="UrlRewriter" type="Intelligencia.UrlRewriter.RewriterHttpModule, Intelligencia.UrlRewriter" />
</httpModules>

</system.web>

<system.webServer>

<modules runAllManagedModulesForAllRequests="true">
<add name="UrlRewriter" type="Intelligencia.UrlRewriter.RewriterHttpModule" />
</modules>

<validation validateIntegratedModeConfiguration="false" />

</system.webServer>

<rewriter>
<rewrite url="~/Article/(.+)-(.+).aspx" to="~/DynamicPage.aspx?MyTitleId=$2"/>
</rewriter>

</configuration>
Paso 5: En el Default.aspx agregamos el GridView que lucira asi:
agregamos este codigo en la ventana de codigo:
<head runat="server">
    <title>Untitled Page</title>
</head>
<body>
    <form id="form1" runat="server">
    <div>    
        <h1>
            <span style="color: #009900">After URL Rewriting</span></h1>
        <asp:GridView ID="GridView1" runat="server" AutoGenerateColumns="False" BackColor="#DEBA84" BorderColor="#DEBA84" BorderStyle="None" BorderWidth="1px" CellPadding="3" CellSpacing="2" Width="788px">
            <FooterStyle BackColor="#F7DFB5" ForeColor="#8C4510" />
            <Columns>
                <asp:TemplateField HeaderText="Title">
                    <ItemTemplate>
                        <asp:HyperLink ID="hlTitle" runat="server" Text='<%#DataBinder.Eval(Container.DataItem,"Title")%>' NavigateUrl='<%#GenerateURL(DataBinder.Eval(Container.DataItem,"Title"),DataBinder.Eval(Container.DataItem,"Id"))%>'></asp:HyperLink>                        
                    </ItemTemplate>
                </asp:TemplateField>
                <asp:TemplateField HeaderText="Description">
                    <ItemTemplate>
                        <asp:Label ID="lblDesc" runat="server" Text='<%#DataBinder.Eval(Container.DataItem,"Description")%>'></asp:Label>
                    </ItemTemplate>
                </asp:TemplateField>
            </Columns>
            <RowStyle BackColor="#FFF7E7" ForeColor="#8C4510" />
            <SelectedRowStyle BackColor="#738A9C" Font-Bold="True" ForeColor="White" />
            <PagerStyle ForeColor="#8C4510" HorizontalAlign="Center" />
            <HeaderStyle BackColor="#A55129" Font-Bold="True" ForeColor="White" />
        </asp:GridView>
         
    </div>
    </form>
</body>
Y este sera el codigo .cs
protected void Page_Load(object sender, EventArgs e)
    {
        GridView1.DataSource = GetData();
        GridView1.DataBind();
    }

    //public static string GenerateURL(object Title, object strId)
    //{
    //    string strTitle = Title.ToString();

    //    strTitle = "~/DynamicPage.aspx?MyTitleId=" + strId;

    //    return strTitle;
    //}

    public static string GenerateURL(object Title, object strId)
    {
        string strTitle = Title.ToString();

        #region Generate SEO Friendly URL based on Title
        //Trim Start and End Spaces.
        strTitle = strTitle.Trim();

        //Trim "-" Hyphen
        strTitle = strTitle.Trim('-');

        strTitle = strTitle.ToLower();
        char[] chars = @"$%#@!*?;:~`+=()[]{}|\'<>,/^&"".".ToCharArray();
        strTitle = strTitle.Replace("c#", "C-Sharp");
        strTitle = strTitle.Replace("vb.net", "VB-Net");
        strTitle = strTitle.Replace("asp.net", "Asp-Net");

        //Replace . with - hyphen
        strTitle = strTitle.Replace(".", "-");

        //Replace Special-Characters
        for (int i = 0; i < chars.Length; i++)
        {
            string strChar = chars.GetValue(i).ToString();
            if (strTitle.Contains(strChar))
            {
                strTitle = strTitle.Replace(strChar, string.Empty);
            }
        }

        //Replace all spaces with one "-" hyphen
        strTitle = strTitle.Replace(" ", "-");

        //Replace multiple "-" hyphen with single "-" hyphen.
        strTitle = strTitle.Replace("--", "-");
        strTitle = strTitle.Replace("---", "-");
        strTitle = strTitle.Replace("----", "-");
        strTitle = strTitle.Replace("-----", "-");
        strTitle = strTitle.Replace("----", "-");
        strTitle = strTitle.Replace("---", "-");
        strTitle = strTitle.Replace("--", "-");

        //Run the code again...
        //Trim Start and End Spaces.
        strTitle = strTitle.Trim();

        //Trim "-" Hyphen
        strTitle = strTitle.Trim('-');
        #endregion

        //Append ID at the end of SEO Friendly URL
        strTitle = "~/Article/" + strTitle + "-" + strId + ".aspx";

        return strTitle;
    }

    private DataTable GetData()
    {
        string strConn = ConfigurationManager.ConnectionStrings["connStr"].ToString();
        SqlConnection conn = new SqlConnection(strConn);
        SqlDataAdapter da = new SqlDataAdapter("select Id,Title,Description from Articletable", conn);
        DataSet ds = new DataSet();
        da.Fill(ds, "Articletable");
        return ds.Tables["Articletable"];
    }
Olvide decirles crean una cadena de conexion en el Webconfig.
 <connectionStrings>
  <add name="connStr" connectionString="Data Source=XSaint;Initial Catalog=Articletable;Integrated Security=SSPI"/>
 </connectionStrings>
Ahora vamos a la segunda pagina DynamicPage.aspx El webform se vera asi:
El codigo ASP.NET para la pagina sera el siguiente:
<head runat="server">
    <title>Untitled Page</title>
</head>
<body>
    <form id="form1" runat="server">
    <div>
        <h1><img src="../Images/article.gif" />Article</h1>
        <b>Title:</b><asp:Label ID="lblTitle" runat="server" Text="Label" Font-Bold="true" ForeColor="blue"></asp:Label><br /><br />
        <b>Author:</b><asp:Label ID="lblauthor" runat="server" Text="Label" Font-Bold="true" ForeColor="blue"></asp:Label><br /><br />
        <b>Description:</b><br />
        <asp:Label ID="lblDescription" runat="server" Text="Label"></asp:Label><br /><br />
        <asp:Button ID="Button1" runat="server" Text="Make PAGE POSTBACK"/><br /><br />
        <a href="javascript:history.go(-1)">Back</a>
    </div>        
    </form>
</body>
Y el codigo .cs sera el siguiente:
protected void Page_Load(object sender, EventArgs e)
    {
        if (Request.QueryString["MyTitleId"] != null)
        {
            string strId = Request.QueryString["MyTitleId"].ToString();
            DisplayArticle(strId);    
        }
    }

    private void DisplayArticle(string strId)
    {     
        string strConn = ConfigurationManager.ConnectionStrings["connStr"].ToString();
        SqlConnection conn = new SqlConnection(strConn);
        SqlDataAdapter da = new SqlDataAdapter("select Id,Title,Description,author from Articletable where Id=" + strId, conn);
        DataSet ds = new DataSet();
        da.Fill(ds, "Articletable");
        lblTitle.Text = ds.Tables["Articletable"].Rows[0][1].ToString();
        lblDescription.Text = ds.Tables["Articletable"].Rows[0][2].ToString();
        lblauthor.Text = ds.Tables["Articletable"].Rows[0][3].ToString();  
    }
Si ghubiese algun error diganme para ayudrles, pero con el codigo que puse debe estar ejecutandose como en la figura de arriba. Espero les sirva el codigo.

lunes, 24 de septiembre de 2012

Como encriptar y desencriptar passwords y almacenarlo en Base de Datos con ASP.NET

Aqui explicare como encriptar data y guardarla en la base de datos y como desencriptar esta data encriptada en la base de datos usando ASP.NET.
En este ejemplo tengo un webform con 4 campos username, password, firstname y lastname lo que hare sera encriptar el password y guardarlo en la base de datos luego voy a jalar este campo y desencriptar este campo y mostrarlo usando un gridview.
El diseño se vera asi:
El codigo en el lado del cliente sera este:
</head>
<body>
<form id="form1" runat="server">
<div>
<table align="center">
<tr>
<td colspan="2">
<b>Encryption and Decryption of Password</b>
</td>
</tr>
<tr>
<td>
UserName
</td>
<td>
<asp:TextBox ID="txtname" runat="server"></asp:TextBox>
</td>
</tr>
<tr>
<td>
Password
</td>
<td>
<asp:TextBox ID="txtPassword" runat="server" TextMode="Password"></asp:TextBox>
</td>
</tr>
<tr>
<td>
FirstName
</td>
<td>
<asp:TextBox ID="txtfname" runat="server"></asp:TextBox>
</td>
</tr>
<tr>
<td>
LastName
</td>
<td>
<asp:TextBox ID="txtlname" runat="server"></asp:TextBox>
</td>
</tr>
<tr>
<td>
</td>
<td>
<asp:Button ID="btnSubmit" runat="server" Text="Submit"
onclick="btnSubmit_Click" />
</td>
</tr>
</table>
</div>
<div>
<table align="center">
<tr>
<td>
<b>Encryption of Password Details</b>
</td>
</tr>
<tr>
<td>
<asp:GridView ID="gvUsers" runat="server" CellPadding="4" BackColor="White"
BorderColor="#CC9966" BorderStyle="None" BorderWidth="1px">
<RowStyle BackColor="White" ForeColor="#330099" />
<FooterStyle BackColor="#FFFFCC" ForeColor="#330099" />
<PagerStyle BackColor="#FFFFCC" ForeColor="#330099" HorizontalAlign="Center" />
<SelectedRowStyle BackColor="#FFCC66" Font-Bold="True" ForeColor="#663399" />
<HeaderStyle BackColor="#990000" Font-Bold="True" ForeColor="#FFFFCC"
HorizontalAlign="Left"/>
</asp:GridView>
</td>
</tr>
</table>
</div>
<div>
<table align="center">
<tr>
<td>
<b>Decryption of Password Details</b>
</td>
</tr>
<tr>
<td>
<asp:GridView ID="gvdecryption" runat="server" BackColor="White"
BorderColor="#CC9966" BorderStyle="None" BorderWidth="1px" CellPadding="4"
onrowdatabound="gvdecryption_RowDataBound">
<RowStyle BackColor="White" ForeColor="#330099" />
<FooterStyle BackColor="#FFFFCC" ForeColor="#330099" />
<PagerStyle BackColor="#FFFFCC" ForeColor="#330099" HorizontalAlign="Center" />
<SelectedRowStyle BackColor="#FFCC66" Font-Bold="True" ForeColor="#663399" />
<HeaderStyle BackColor="#990000" Font-Bold="True" ForeColor="#FFFFCC" />
</asp:GridView>
</td>
</tr>
</table>
</div>
</form>
Despues de esto en el lado del servidor agregar los namespace
System.Text y System.Data.SQLCliente. En el primero contiene clases que representan codificacion de caracteres ASCII y Unicode y con el segundo nos permitira crear conexiones a la Base de Datos.
Despues de esto diseñamos una BD con el nombre que quieran, crean 1 tabla de nombre Usuario con 4 campos tipo nvarchar username, password, firstname y lastname.
private const string strconnection = "Data Source=XSaint;Initial Catalog=XSaint;Integrated Security=True";
    SqlConnection con = new SqlConnection(strconnection);
    protected void Page_Load(object sender, EventArgs e)
    {
        if (!IsPostBack)
        {
            BindencryptedData();
            BindDecryptedData();
        }
    }

    protected void btnSubmit_Click(object sender, EventArgs e)
    {
        string strpassword = Encryptdata(txtPassword.Text);
        con.Open();
        SqlCommand cmd = new SqlCommand("insert into Usuario(UserName,Password,FirstName,LastName) values('" + txtname.Text + "','" + strpassword + "','" + txtfname.Text + "','" + txtlname.Text + "')", con);
        cmd.ExecuteNonQuery();
        con.Close();
        BindencryptedData();
        BindDecryptedData();
    }
    protected void BindencryptedData()
    {
        con.Open();
        SqlCommand cmd = new SqlCommand("select * from Usuario", con);
        SqlDataAdapter da = new SqlDataAdapter(cmd);
        DataSet ds = new DataSet();
        da.Fill(ds);
        gvUsers.DataSource = ds;
        gvUsers.DataBind();
        con.Close();
    }
    protected void BindDecryptedData()
    {
        con.Open();
        SqlCommand cmd = new SqlCommand("select * from Usuario", con);
        SqlDataAdapter da = new SqlDataAdapter(cmd);
        DataSet ds = new DataSet();
        da.Fill(ds);
        gvdecryption.DataSource = ds;
        gvdecryption.DataBind();
        con.Close();
    }
    private string Encryptdata(string password)
    {
        string strmsg = string.Empty;
        byte[] encode = new byte[password.Length];
        encode = Encoding.UTF8.GetBytes(password);
        strmsg = Convert.ToBase64String(encode);
        return strmsg;
    }
    private string Decryptdata(string encryptpwd)
    {
        string decryptpwd = string.Empty;
        UTF8Encoding encodepwd = new UTF8Encoding();
        Decoder Decode = encodepwd.GetDecoder();
        byte[] todecode_byte = Convert.FromBase64String(encryptpwd);
        int charCount = Decode.GetCharCount(todecode_byte, 0, todecode_byte.Length);
        char[] decoded_char = new char[charCount];
        Decode.GetChars(todecode_byte, 0, todecode_byte.Length, decoded_char, 0);
        decryptpwd = new String(decoded_char);
        return decryptpwd;
    }

    protected void gvdecryption_RowDataBound(object sender, GridViewRowEventArgs e)
    {
        if (e.Row.RowType == DataControlRowType.DataRow)
        {
            string decryptpassword = e.Row.Cells[1].Text;
            e.Row.Cells[1].Text = Decryptdata(decryptpassword);
        }
    }
al ejecutar les saldra como la foto de arriba =)

domingo, 23 de septiembre de 2012

Validacion de Direcciones Postales de USA en ASP.NET

Para este proyecto descargaremos la dll llamada USPSAddressValidator y la agregamos como referencia a nuestro proyecto. Ademas crearemos 2 paginas de nombre AddressValidator y AddressVerification. En el primero lo diseñamos de la siguiente forma:
Ahora el codigo del cliente tendra este codigo(AddressValidator.aspx):
<head runat="server">
    <title>Address Verification For USA</title>
    <script type="text/javascript">


        function YahooWindow() {
            var street = document.getElementById('<%=txtAddress.ClientID %>').value;
            var city = document.getElementById('<%=txtCity1.ClientID %>').value;
            var e = document.getElementById('<%=ddlState.ClientID%>');
            //For ModelWindow then uncomment below code
//            $("#Address1").fancybox({
//                'width': '55%',
//                'height': '30%',
//                'autoScale': false,
//                'transitionIn': 'none',
//                'transitionOut': 'none',
//                'type': 'iframe'
//            });
            var strV = e.options[e.selectedIndex].text;
            //alert(city);
            document.getElementById('Address2').href = 'AddressVerification.aspx?street=' + street + '&city=' + city + '&state=' + strV + ''
            //yahoowin = dhtmlmodal.open('yahoo', 'iframe', 'AddressVerification.aspx?street=' + street + '&city=' + city + '&state=' + strV + '', 'Address Verification', 'width=400px,height=350px,center=1');
            //             $("#Address1").click();
            //             return false;
        }
    </script>
</head>
<body>
    <form id="form1" runat="server">
    <div>
        <table>
            <tr>
                <td class="sub02" width="180px">
                    Address:
                </td>
                <td>
                    <asp:TextBox runat="server" ID="txtAddress" CssClass="input" />
                    <a href="#" id="Address2" onclick="return YahooWindow();">[Verify Address] </a><a
                        href="#" id="Address1"></a>
                
                </td>
            </tr>
            <tr>
                <td class="sub02" width="180px">
                    City:
                </td>
                <td>
                    <asp:TextBox runat="server" ID="txtCity1" CssClass="input" />
                   
                </td>
            </tr>
            <tr>
                <td class="sub02" width="180px">
                    State:
                </td>
                <td>
                    <asp:DropDownList runat="server" ID="ddlState" CssClass="input">
                        <asp:ListItem>--Select State--</asp:ListItem>
                        <asp:ListItem>AK</asp:ListItem>
                        <asp:ListItem>AL</asp:ListItem>
                        <asp:ListItem>AR</asp:ListItem>
                        <asp:ListItem>AZ</asp:ListItem>
                        <asp:ListItem>CA</asp:ListItem>
                        <asp:ListItem>CO</asp:ListItem>
                        <asp:ListItem>CT</asp:ListItem>
                        <asp:ListItem>DC</asp:ListItem>
                        <asp:ListItem>DE</asp:ListItem>
                        <asp:ListItem>FL</asp:ListItem>
                        <asp:ListItem>GA</asp:ListItem>
                        <asp:ListItem>HI</asp:ListItem>
                        <asp:ListItem>IA</asp:ListItem>
                        <asp:ListItem>ID</asp:ListItem>
                        <asp:ListItem>IL</asp:ListItem>
                        <asp:ListItem>IN</asp:ListItem>
                        <asp:ListItem>KS</asp:ListItem>
                        <asp:ListItem>KY</asp:ListItem>
                        <asp:ListItem>LA</asp:ListItem>
                        <asp:ListItem>MA</asp:ListItem>
                        <asp:ListItem>MD</asp:ListItem>
                        <asp:ListItem>ME</asp:ListItem>
                        <asp:ListItem>MI</asp:ListItem>
                        <asp:ListItem>MN</asp:ListItem>
                        <asp:ListItem>MO</asp:ListItem>
                        <asp:ListItem>MS</asp:ListItem>
                        <asp:ListItem>MT</asp:ListItem>
                        <asp:ListItem>NC</asp:ListItem>
                        <asp:ListItem>ND</asp:ListItem>
                        <asp:ListItem>NE</asp:ListItem>
                        <asp:ListItem>NH</asp:ListItem>
                        <asp:ListItem>NJ</asp:ListItem>
                        <asp:ListItem>NM</asp:ListItem>
                        <asp:ListItem>NV</asp:ListItem>
                        <asp:ListItem>NY</asp:ListItem>
                        <asp:ListItem>OH</asp:ListItem>
                        <asp:ListItem>OK</asp:ListItem>
                        <asp:ListItem>OR</asp:ListItem>
                        <asp:ListItem>PA</asp:ListItem>
                        <asp:ListItem>RI</asp:ListItem>
                        <asp:ListItem>SC</asp:ListItem>
                        <asp:ListItem>SD</asp:ListItem>
                        <asp:ListItem>TN</asp:ListItem>
                        <asp:ListItem>TX</asp:ListItem>
                        <asp:ListItem>UT</asp:ListItem>
                        <asp:ListItem>VA</asp:ListItem>
                        <asp:ListItem>VT</asp:ListItem>
                        <asp:ListItem>WA</asp:ListItem>
                        <asp:ListItem>WI</asp:ListItem>
                        <asp:ListItem>WV</asp:ListItem>
                        <asp:ListItem>WY</asp:ListItem>
                    </asp:DropDownList>
                </td>
            </tr>
            <tr>
                <td class="sub02" width="180px">
                    Zip:
                </td>
                <td>
                    <asp:TextBox runat="server" ID="txtZipCode" CssClass="input" />
                </td>
            </tr>
        </table>
    </div>
    </form>
</body>
El diseño de nuestro 2 webform el cual nos mostrara si la direccion es valida sera el siguiente:
El codigo del lado del cliente sera este(Addressverification.aspx)
<head runat="server">
    <title></title>
    <style type="text/css">
    body{ margin:0;
          padding:0;
          font-family:Arial, helventica, Verdana;
          font-size:11px;
    }
    </style>
</head>
<body>
    <form id="form1" runat="server">
    <div  style="text-align: left; vertical-align: middle;">
    
    <asp:Image runat="server" id="imgNo" ImageAlign="AbsMiddle" 
            ImageUrl="~/images/cancel_128x128.png" Height="65px" Width="71px"></asp:Image>
    <asp:Image runat="server" id="imgYes" ImageAlign="AbsMiddle" 
            ImageUrl="~/images/k10760520.jpg" Height="59px" Width="62px"></asp:Image>    
    <asp:Label runat="server" id="lblVerification"></asp:Label>    
    </div>
    <div  style="text-align: left; padding-left:75px;">
    <asp:RadioButton runat="server" id="rdo1" Text="Give me some address suggestions" GroupName="rdosug" AutoPostBack="true"></asp:RadioButton><br /> 
    <asp:RadioButton runat="server" id="rdo2" Text="The address I entered is correct" GroupName="rdosug" AutoPostBack="true"></asp:RadioButton> <br /> 
    <asp:RadioButton runat="server" id="rdo3" Text="I will make my address corrections  " GroupName="rdosug" AutoPostBack="true"></asp:RadioButton>    
    </div>
    </form>
</body>
En el codigo del lado del servidor escriben lo siguiente(AddressVerification.aspx.vb)
Imports System.Web.UI.HtmlControls
Imports System.Configuration
Imports System.Net
Partial Class AddressVerification
    Inherits System.Web.UI.Page
    Private Function ValidateAddress(ByVal street As String, ByVal city As String, ByVal state As String) As String
        If ConfigurationManager.AppSettings("proxy") <> [String].Empty Then
            Dim p As WebProxy = Nothing
            Dim proxyAddressAndPort As String = ConfigurationManager.AppSettings("proxy")
            Dim proxyUserName As String = ConfigurationManager.AppSettings("proxyUserName")
            Dim proxyPassword As String = ConfigurationManager.AppSettings("proxyPassword")
            Dim cred As ICredentials
            cred = New NetworkCredential(proxyUserName, proxyPassword)
            p = New WebProxy(proxyAddressAndPort, True, Nothing, cred)
            GlobalProxySelection.[Select] = p
        End If
        If street = String.Empty Then
            street = "Test"
        End If
        If city = String.Empty Then
            city = "Test"
        End If
        If state = "--Select State--" Then
            state = "TA"
        End If
        Dim res As String = PAB.Utils.USPS.AddressValidator.ValidateAddress(street, city, state)
        Return res
    End Function

    Protected Sub Page_Load(ByVal sender As Object, ByVal e As System.EventArgs) Handles Me.Load
        If Not Request("city") Is Nothing Then
            Dim strvalid As String = String.Empty
            strvalid = Me.ValidateAddress(Request("street"), Request("city"), Request("state"))
            If strvalid = "Invalid Address" Then
                lblVerification.Text = "We’re sorry.  We were unable to verify your address with the United States Postal Service."
                imgYes.Visible = False
            Else
                lblVerification.Text = "Congratulations!  We have successfully verified your shipping address!"
                imgNo.Visible = False
                rdo1.Visible = False
                rdo2.Visible = False
                rdo3.Visible = False

            End If
        End If
    End Sub
End Class
. finalmente en nuestro web.config modificamos nuestra etiqueta appconfig y la escribimos como esta abajo:
<appSettings>
    <add key="proxy" value="10.10.201.3:8080"/>
    <add key="proxyUserName" value=""/>
    <add key="proxyPassword" value=""/>
  </appSettings>
si pusieron todo el codigo como les indique les debe salir asi:
U.S.A Postal Address Validation
Espero les ayude este ejemplo

Uso de Hashtable para Checkboxlist en ASP.NET

Para hacer esto escribimos este codigo en el lado del cliente(Default.aspx):
<form id="form1" runat="server">
<div>

<asp:CheckBoxList ID="CheckBoxList1" runat="server">
</asp:CheckBoxList>
<asp:Button ID="Button1" runat="server" Text="Button" onclick="Button1_Click" />
<br />
<br />
Text: <asp:Label ID="Label1" runat="server" Text="Label"></asp:Label>
<br />    
Value:  <asp:Label ID="Label2" runat="server" Text="Label"></asp:Label>
</div>
</form>
Ahora en el lado del servidor utilizaremos la propiedad IsPostBack en la cual inicializamos nuestro HashTable y lo agregamos a un CheckBox, y en el boton indicaremos que items se dieron check junto con sus IDS.
using System.Collections;
public partial class _Default : System.Web.UI.Page 
{
    protected void Page_Load(object sender, EventArgs e)
    {
        Label1.Text = string.Empty;
        Label2.Text = string.Empty;
        if (!IsPostBack)
        {
            Hashtable hs = new Hashtable();
            hs.Add("1", "sajjad");
            hs.Add("2", "ahmed");
            hs.Add("3", "imtiaz");
            hs.Add("4", "ghazi");
            hs.Add("5", "sohail");
            hs.Add("6", "zahid");
            hs.Add("7", "irfan");
            CheckBoxList1.DataSource = hs;
            CheckBoxList1.DataValueField = "Key";
            CheckBoxList1.DataTextField = "Value";
            CheckBoxList1.DataBind();
        }
    }
    protected void Button1_Click(object sender, EventArgs e)
    {
        Label1.Text = string.Empty;
        Label2.Text = string.Empty;
        foreach (ListItem listitem in CheckBoxList1.Items)
        {
            if (listitem.Selected)
            {
                Label1.Text += listitem.Text + "     ,     ";
                Label2.Text += listitem.Value + "     ,     ";
            }
        }
    }
}

sábado, 22 de septiembre de 2012

Generar passwords aleatorios en ASP.NET

En este ejemplo generaremos una clave aleatoria ingresando la longitud de la misma en el textbox y dando click en el boton se mostrara en el label:
En el lado del cliente agregamos este codigo(Default.aspx)
<form id=”form1″ runat=”server”>
<div>
<asp:TextBox ID=”TextBox1″ runat=”server”></asp:TextBox>
<asp:Button ID=”rndpwd” runat=”server” Text=”Generate Pwd” onclick=”rndpwd_Click” />
<br />
<asp:Label ID=”Label1″ runat=”server” Text=”Label”></asp:Label>
</div>
</form>
Ahora creamos una clase en el app_code y escribimos este metodo ahi:
public static string GetRandomPassword(int length)
    {
        char[] chars = "$%#@!*abcdefghijklmnopqrstuvwxyz1234567890?;:ABCDEFGHIJKLMNOPQRSTUVWXYZ^&".ToCharArray();
        string password = string.Empty;
        Random random = new Random();

        for (int i = 0; i < length; i++)
        {
            int x = random.Next(1,chars.Length);
            //Don't Allow Repetation of Characters
            if (!password.Contains(chars.GetValue(x).ToString()))
                password += chars.GetValue(x);
            else
                i--;
        }
        return password;
    }
Llamamos esta pagina en el lado del servidor utilizando el evento click del boton de la siguiente manera:
protected void rndpwd_Click(object sender, EventArgs e)
    {
        Label1.Text = PasswordGeneration.GetRandomPassword(Convert.ToInt32(TextBox1.Text));
    }
y listo ejecuten el codigo ingresan un numero y les saldra un password de esa longitud

Validar direcciones email usando JQuery en ASP.NET

Veremos aqui una funcionalidad basica para validar direcciones email. En este post, te mostrare como validar direcciones email usando JQuery. Para validar direcciones email, he creado una funcion separada la cual basada en direcciones email, retorna verdadero o falso. La validacion de direcciones email la hacemos utilizando expresiones regulares.
Para implementar este codigo necesitamos escribir codigo como muestro abajo en su pagina aspx(este codigo lo colocan debajo de la etiqueta title)
<script type="text/javascript" src="http://ajax.googleapis.com/ajax/libs/jquery/1.7.2/jquery.min.js">
</script>
<script type="text/javascript">
$(document).ready(function () {
$("#btnValidate").click(function () {
var EmailText = $("#txtEmail").val();
if ($.trim(EmailText).length == 0) {
alert("Please enter email address");
return false;
}
if (validateEmail(EmailText)) {
alert('Valid Email Address');
return true;
}
else {
alert('Invalid Email Address');
return false;
}
});
});
function validateEmail(sEmail) {
var filter = /^([\w-\.]+)@((\[[0-9]{1,3}\.[0-9]{1,3}\.[0-9]{1,3}\.)|(([\w-]+\.)+))([a-zA-Z]{2,4}|[0-9]{1,3})(\]?)$/;
if (filter.test(sEmail)) {
return true;
}
else {
return false;
}
}
</script></head>
<body>
<form id="form1" runat="server">
<div>
<asp:TextBox ID="txtEmail" runat="server"/>
<asp:Button ID="btnValidate" runat="server" Text="Validate" />
</div>
</form>
</body>
Como ven en el codigo de arriba en la seccion header agregue un link de archivo script, usando ese archivo tenemos una chance de interactuar con JQuery y en el script tenemos la funcion click del boton btnValidate el cual es usado para validar direcciones email usando JQuery en ASP.NET

Como encriptar y desencriptar parametros Query Strings en ASP.NET

Los query strings son un modo facil de pasar informacion de una pagina a otra. El problema con los query strings es que la informacion es visible en la URL. Y muchas veces se ha pasado por alto este detalle y hay veces que necesitamos encriptar cierta informacion para evitar ataques tipo SQL Injection.En el siguiente ejemplo ingresaremos una cadena y mostraremos la misma encriptada en la Barra de Direcciones.
Creamos un sitio wseb y agregamos otro webform aparte del que nos viene por defecto:
En nuestra primera pagina agregamos un textbox y un boton
<body>
    <form id="form1" runat="server">
<div>
        <asp:TextBox ID="txt1" runat="server"></asp:TextBox>
        <asp:Button ID="btn1" runat="server" Text="Button" onclick="btn1_Click" />         
    </div>
    </form>
</body>
escribiremos codigo en el evento Click del boton y declaramos una variable global de tipo string:
string encodedString;//Declare this is in  Global 
    protected void btn1_Click(object sender, EventArgs e)
    {        
        string str = txt1.Text;      
        encodedString = (Convert.ToBase64String(System.Text.ASCIIEncoding.ASCII.GetBytes(str)));      
        Response.Redirect("~/Default2.aspx?str=" + encodedString);    
    }
Este codigo ira en la primera pagina que nos pedira ingresar un texto en el textbox y nos mostrara en la 2 pagina el mismo texto pero en la cadena saldra encriptado como en la foto del principio. Ahora en la 2 pagina agregamos un label este sera el codigo en html:
<div>
        <asp:Label ID="Label1" runat="server" Text="Label"></asp:Label>
    </div>
Y este es el codigo en C#:
string decodedString;//Declare this is in  Global
    protected void Page_Load(object sender, EventArgs e)
    {
        decodedString = System.Text.ASCIIEncoding.ASCII.GetString(Convert.FromBase64String(Request.QueryString["str"]));
        Label1.Text = decodedString; 
    }
Este pequeño codigo fue un ejemplo de encriptacion basica espero les haya sido util.

Como mostrar efecto Loading de Google en GridView en ASP.NET

Google Loading Gridview ASP.NET
Para lograr el efecto que ven en la imagen vamos a crear un sitio web en C#, y le agregaremos un Control ScriptManager, un Gridview y un DropDownList, ahora crearemos una nueva ficha en el Cuadro de Herramientas:
le ponemos de nombre AJAX y agregamos la dll AjaxControlToolkit, pueden bajarla de aqui pero descarguen la version binaria no el source code. Una vez descargado lo agregamos a nuestro proyecto desde la ficha que creamos, vamos a la opcion Elegir Elementos:
Ajax Control Toolkit
En la pestaña Componentes de .NET Framework agregamos Referencia:
damos click en el boton Examinar y agregamos nuestra dll que bajamos. Una vez descargada podemos utilizar un control UpdatePanelAnimationExtender que necesitaremos para este ejemplo.
UpdatePanelAnimationExtender brinda la facilidad de mostrar alguna animacion mientras el UpdatePanel demora en ejecutar la operacion que se le ha encomendado a realizar.
Por ejemplo si tuviese que mostrar informacion cuyo origen de datos requiere mayor tiempo de ejecucion, pues el UpdatePanelAnimationExtender es la opcion a usar.
El codigo de nuestra pagina sera este:
<body>
    <script type="text/javascript" language="javascript">
        function onUpdating() {
            // get the update progress div
            var updateProgressDiv = $get('updateProgressDiv');
            // get the gridview element
            var gridView = $get('<%= this.grd.ClientID %>');
            // make it visible
            updateProgressDiv.style.display = '';
            // get the bounds of both the gridview and the progress div
            var gridViewBounds = Sys.UI.DomElement.getBounds(gridView);
            var updateProgressDivBounds = Sys.UI.DomElement.getBounds(updateProgressDiv);
            var x;
            var y;
            // do the math to figure out where to position the element
            // center of gridview
            x = gridViewBounds.x + Math.round(gridViewBounds.width / 2) - Math.round(updateProgressDivBounds.width / 2);
            y = gridViewBounds.y + Math.round(gridViewBounds.height / 2) - Math.round(updateProgressDivBounds.height / 2);
            // set the progress element to this position
            Sys.UI.DomElement.setLocation(updateProgressDiv, x, y);
        }
        function onUpdated() {
            // get the update progress div
            var updateProgressDiv = $get('updateProgressDiv');
            // make it invisible
            updateProgressDiv.style.display = 'none';
        }
    </script>
    <form id="form1" runat="server">
    <asp:ScriptManager ID="ScriptManager1" runat="server">
    </asp:ScriptManager>
    <div>
        <asp:UpdatePanel ID="updatePanel" runat="server">
            <ContentTemplate>
                <asp:GridView ID="grd" runat="server" OnPageIndexChanging="grd_PageIndexChanging"
                    AllowPaging="true" PageSize="10">
                </asp:GridView>
            </ContentTemplate>
        </asp:UpdatePanel>
        <cc1:ComboBox runat="server">
        </cc1:ComboBox>
        <cc1:UpdatePanelAnimationExtender ID="upae" BehaviorID="animation" runat="server"
            TargetControlID="updatePanel">
            <Animations>
                <OnUpdating>
                    <Parallel duration="0">
    <%-- place the update progress div over the gridview control --%>
                <ScriptAction Script="onUpdating();" />
                </Parallel>
                </OnUpdating>
                <OnUpdated>
                    <Parallel duration="0">
            <%--find the update progress div and place it over the gridview control--%>
                    <ScriptAction Script="onUpdated();" />
                    </Parallel>
                </OnUpdated>
            </Animations>
        </cc1:UpdatePanelAnimationExtender>
        <div id="updateProgressDiv" style="background-color: #CF4342; display: none; position: absolute;">
            <span style="color: #fff; margin: 3px">Loading ... </span>
        </div>
    </div>
    </form>
</body>
El bloque script lo agregue dentro del body para evitar que me aparezca en la pagina este mensaje La colección de controles no puede modificarse porque el control contiene bloques de código (por ej. <% ... %>). .
Ahora en nuestra pagina agregamos el siguiente codigo de C#
protected void Page_Load(object sender, EventArgs e)
    {
        if (!IsPostBack)
        {
            if (Session["ds"] != null)
            {
                grd.DataSource = Session["ds"] as DataTable;
                grd.DataBind();
            }
            else
            {
                grd.DataSource = CreateDataTable();
                grd.DataBind();
            }
        }
    }
    public DataTable CreateDataTable()
    {
        DataTable dt = new DataTable();
        dt.Columns.Add(new DataColumn("Id", typeof(string)));
        dt.Columns.Add(new DataColumn("Name", typeof(string)));
        DataRow dr;
        for (int i = 0; i <= 100; i++)
        {

            dr = dt.NewRow();
            dr[0] = i.ToString();
            dr[1] = "Test" + i.ToString();
            dt.Rows.Add(dr);
        }
        Session["ds"] = dt;
        return dt;
    }

    protected void grd_PageIndexChanging(object sender, GridViewPageEventArgs e)
    {
        //Remove this on Application server
        System.Threading.Thread.Sleep(3000);
        grd.PageIndex = e.NewPageIndex;
        grd.DataSource = Session["ds"] as DataTable;
        grd.DataBind();
    }
y listo a disfrutar =)

Truco:Filtrar una cadena y extraer numeros en ASP.NET

En este post explicare como extraer numeros de una cadena de caracteres usando expresiones regulares:
Primero creamos un sitio web y agregamos un Textbox, un boton y un label.
damos doble click en el boton y debajo del evento click escribimos esta funcion:
public string ExtractNumbers(string expr)
    {
        return string.Join(null, System.Text.RegularExpressions.Regex.Split(expr, "[^\\d]"));
    }
y llamamos a esta funcion en el evento click del boton de la siguiente manera:
protected void btnExtract_Click(object sender, EventArgs e)
    {
        lblMessage.Text = ExtractNumbers(txtInput.Text);
    }
y

viernes, 21 de septiembre de 2012

Truco:Importar contactos de Gmail en ASP.NET

Muchas veces necesitamos desarrollar aplicaciones web las cuales requieren importar o extraer contactos de Gmail o del libro de direcciones.
En este ejemplo voy a importar contactos Gmail en una aplicacion web ASP.NET usando C# y VB.NET.
Para empezar necesitamos descargar estas 4 .dll que citare abajo:
  1. Google.GData.Apps.dll
  2. Google.GData.Client.dll
  3. Google.GData.Contacts.dll
  4. Google.GData.Extensions.dll
Pueden conseguirlas descargando la API de Google Data e instalando en el sistema. Pueden bajarlo aqui y consiguen las dlls que les mencione antes.
Creamos un nuevo sitio web en C# y agregamos como referencia estas DLLs.
Pulsamos Aceptar y se agregaran a nuestra carpeta BIN del proyecto, ahora agregamos 2 textbox, un listbox y un boton para importar los contactos.
si gustan el codigo HTML de esta parte aqui les paso:
Email Address :


Password :


Contacts:


Ahora en nuestro codigo de la pagina aspx agregamos las siguientes directivas de abajo:
using Google.Contacts;
using Google.GData.Client;
using Google.GData.Contacts;
using Google.GData.Extensions;
y en el evento Click de nuestro boton agregamos este codigo:
//Provide Login Information
        RequestSettings rsLoginInfo = new RequestSettings("", txtEmail.Text, txtPassword.Text);
        rsLoginInfo.AutoPaging = true; 
        // Fetch contacts and dislay them in ListBox
        ContactsRequest cRequest = new ContactsRequest(rsLoginInfo);
        Feed feedContacts = cRequest.GetContacts();
        foreach (Contact gmailAddresses in feedContacts.Entries)
        {
            Console.WriteLine("\t" + gmailAddresses.Title);
            lstContacts.Items.Add(gmailAddresses.Title);
            foreach (EMail emailId in gmailAddresses.Emails)
            {
                Console.WriteLine("\t" + emailId.Address);
                lstContacts.Items.Add(" " + emailId.Address);
            }
        }
Ejecutan el codigo y al pulsar el boton les saldra su lista de contactos como en la figura:

Resaltar fila de GridView al pasar el puntero con Javascript en ASP.NET

Muchos de nosotros queremos controlar el resaltado de ciertas filas del gridview al pasar el puntero, si utilizamos javascript sera facil y podemos hacerlo con algunas lineas de codigo del lado del servidor.
En este ejemplo he usado color de resaltado verde y el grid es sencillo utilice la BD Northwind agregue un SQLDataSource que contiene un select a una tabla y despues lo llame en Origen de Datos desde el GridView.
en el evento DataBound del GridView agregamos este codigo:
foreach (GridViewRow grow in GridView1.Rows)
        {
            grow.Attributes["onmouseover"] = "highlight(this, true);";
            grow.Attributes["onmouseout"] = "highlight(this, false);";
            HttpResponse myHttpResponse = Response;
            HtmlTextWriter myHtmlTextWriter = new HtmlTextWriter(myHttpResponse.Output);
            grow.Attributes.AddAttributes(myHtmlTextWriter);
        }
espero les haya servido el codigo =)

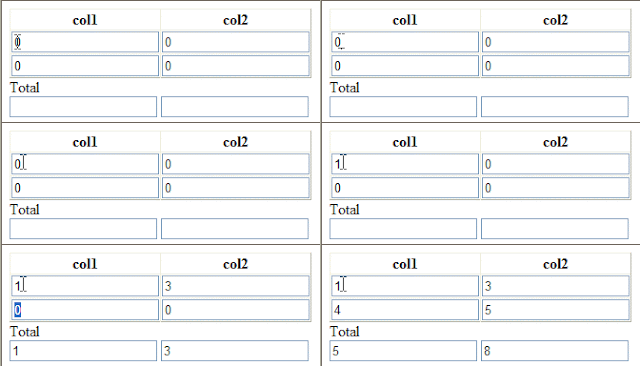
Mostrar total de suma de columnas de Gridview con evento OnBlur y Javascript en ASP.NET

Encontre este truquito navegando un poco por Internet, para esto primero creamos nuestro GridView:
<asp:GridView ID="GridView1" runat="server" AutoGenerateColumns="false" 
            onrowdatabound="GridView1_RowDataBound">
        <Columns>        
 <asp:TemplateField HeaderText="col1">
<ItemTemplate>
<asp:TextBox ID="txtcol1" Text='<%#Eval("id1") %>' runat="server">
</asp:TextBox>
 </ItemTemplate>
 </asp:TemplateField> 
  <asp:TemplateField HeaderText="col2">
<ItemTemplate>
<asp:TextBox ID="txtcol2" Text='<%#Eval("id2") %>' runat="server">
</asp:TextBox>
 </ItemTemplate>
 </asp:TemplateField> 
        </Columns>
        </asp:GridView>   
Ahora creamos nuestra funcion JavaScript:
function JvfunonBlur()
    {
      var grid = document.getElementById('<%=GridView1.ClientID %>');
        var col1;
        var totalcol1 = 0;
        var col2;
        var totalcol2 = 0;         
        for (i = 0; i < grid.rows.length; i++) 
        {
            col1 = grid.rows[i].cells[0];
            col2 = grid.rows[i].cells[1];
            
             for (j = 0; j < col1.childNodes.length; j++) 
             {
                if (col1.childNodes[j].type == "text")
                 {
                 if(!isNaN(col1.childNodes[j].value) &&  col1.childNodes[j].value != "")
                     {
                        totalcol1 += parseInt(col1.childNodes[j].value)
                     }
                }
             }            
             for (j = 0; j < col2.childNodes.length; j++)
             {
                if (col2.childNodes[j].type == "text")
                 {
                     if(!isNaN(col2.childNodes[j].value) &&  col2.childNodes[j].value != "")
                     {
                        totalcol2 += parseInt(col2.childNodes[j].value)
                     }
                }
            }
        }
        document.getElementById('<%=txttotal1.ClientID %>').value = totalcol1;
        document.getElementById('<%=txttotal2.ClientID %>').value = totalcol2;
    }   
Llamamos a esta funcion Javascript en el evento RowDataBound en el codigo de C#, aqui abajo veran el codigo completo junto la funcion que llena el Grid en el evento PostBack.
protected void Page_Load(object sender, EventArgs e)
    {
        if (!Page.IsPostBack)
        {
            FillGrid();
        }
    }
    private void FillGrid()
    {
        DataTable dt = new DataTable();
        dt.Columns.Add("id1", typeof(int));
        dt.Columns.Add("id2", typeof(int));
        dt.Rows.Add(0, 0);
        dt.Rows.Add(0, 0);
        GridView1.DataSource = dt;
        GridView1.DataBind();        
    }
    protected void GridView1_RowDataBound(object sender, GridViewRowEventArgs e)
    {
        if (e.Row.RowType == DataControlRowType.DataRow)
        {
            TextBox txt = (TextBox)e.Row.FindControl("txtcol1");
            txt.Attributes.Add("onBlur", "JvfunonBlur();");
            TextBox txt1 = (TextBox)e.Row.FindControl("txtcol2");
            txt1.Attributes.Add("onBlur", "JvfunonBlur();");
        }
    }
}
Bueno si prefieren pegar el codigo de uno solo aqui esta para la parte .aspx:
<%@ Page Language="C#" AutoEventWireup="true"  CodeFile="Default.aspx.cs" Inherits="_Default" %>

<!DOCTYPE html PUBLIC "-//W3C//DTD XHTML 1.0 Transitional//EN" "http://www.w3.org/TR/xhtml1/DTD/xhtml1-transitional.dtd">

<html xmlns="http://www.w3.org/1999/xhtml">
<head id="Head1" runat="server">
    <title>Untitled Page</title>
    <script type="text/javascript">
    function JvfunonBlur()
    {
      var grid = document.getElementById('<%=GridView1.ClientID %>');
        var col1;
        var totalcol1 = 0;
        var col2;
        var totalcol2 = 0;         
        for (i = 0; i < grid.rows.length; i++) 
        {
            col1 = grid.rows[i].cells[0];
            col2 = grid.rows[i].cells[1];
            
             for (j = 0; j < col1.childNodes.length; j++) 
             {
                if (col1.childNodes[j].type == "text")
                 {
                 if(!isNaN(col1.childNodes[j].value) &&  col1.childNodes[j].value != "")
                     {
                        totalcol1 += parseInt(col1.childNodes[j].value)
                     }
                }
             }            
             for (j = 0; j < col2.childNodes.length; j++)
             {
                if (col2.childNodes[j].type == "text")
                 {
                     if(!isNaN(col2.childNodes[j].value) &&  col2.childNodes[j].value != "")
                     {
                        totalcol2 += parseInt(col2.childNodes[j].value)
                     }
                }
            }
        }
        document.getElementById('<%=txttotal1.ClientID %>').value = totalcol1;
        document.getElementById('<%=txttotal2.ClientID %>').value = totalcol2;
    }   
    </script>
</head>
<body>
    <form id="form1" runat="server">
    <div>    
        <asp:ScriptManager ID="ScriptManager1" runat="server">
        </asp:ScriptManager>  
    <asp:UpdatePanel ID="UpdatePanel1" runat="server">
    <ContentTemplate>    
        <asp:GridView ID="GridView1" runat="server" AutoGenerateColumns="false" 
            onrowdatabound="GridView1_RowDataBound">
        <Columns>        
 <asp:TemplateField HeaderText="col1">
<ItemTemplate>
<asp:TextBox ID="txtcol1" Text='<%#Eval("id1") %>' runat="server">
</asp:TextBox>
 </ItemTemplate>
 </asp:TemplateField> 
  <asp:TemplateField HeaderText="col2">
<ItemTemplate>
<asp:TextBox ID="txtcol2" Text='<%#Eval("id2") %>' runat="server">
</asp:TextBox>
 </ItemTemplate>
 </asp:TemplateField> 
        </Columns>
        </asp:GridView>       
        Total
         <br />
        <asp:TextBox ID="txttotal1" runat="server"></asp:TextBox>
        <asp:TextBox ID="txttotal2" runat="server"></asp:TextBox>
        <br />        
    </ContentTemplate>
    </asp:UpdatePanel>
        </div>
    </form>
</body>
</html>

sábado, 15 de septiembre de 2012

Filtrar GridView con DropDownList en ASP.NET

En este ejemplo explicare como filtrar un gridview con dropdownlist en ASP.NET usando FilterExpression con SQL y SQLDataSource. Al final del proyecto se vera asi:
Para este ejemplo cree una base de Datos simple llamada Guitarist, y contendra las siguientes columnas de abajo:
CREATE TABLE [dbo].[topguitarist](
 [guitaristid] [int] NULL,
 [playername] [nvarchar](50) NULL,
 [playerstyle] [nvarchar](50) NULL,
 [associatedacts] [nvarchar](50) NULL,
 [famousperformance] [nvarchar](50) NULL
) 
y lo llenan con datos de este archivo Excel:
ahora a nuestro proyecto le agregamos 2 DataSources, 1 DropDownList y un GridView. El primer DataSource lo configuramos para que liste los estilos de musica el cual se cargara en el DropDownList y el segundo sera para el GridView.
Configuramos el origen de datos del SqlDataSource1 y lo ponemos asi:
el segundo SQLDatSource lo configuran que muestre todos los campos de la tabla y agregan un FilterExpression que sera el DropDownList, el codigo sera el siguiente:
<asp:SqlDataSource ID="SqlDataSource1" runat="server" 
            ConnectionString="<%$ ConnectionStrings:guitaristConnectionString %>" 
            SelectCommand="SELECT DISTINCT [playerstyle] FROM [topguitarist]">
        </asp:SqlDataSource>
    
        <asp:SqlDataSource ID="SqlDataSource2" runat="server" 
            ConnectionString="<%$ ConnectionStrings:guitaristConnectionString3 %>" 
            
            SelectCommand="SELECT [guitaristid], [playername], [playerstyle], [associatedacts], [famousperformance] FROM [topguitarist]"
            FilterExpression="[playerstyle] like '{0}%'">
            <FilterParameters>
            <asp:ControlParameter ControlID="DropDownList1" Name="playerstyle" 
                    PropertyName="SelectedValue" Type="String" />

            </FilterParameters>
        </asp:SqlDataSource>
Ahora a nuestro DropDownList lo enlazamos con el SQLDataSource1 asi:
Luego de esto vamos a Editar Elementos y Agregamos la Opcion All.
el codigo del DropDownList sera el siguiente:
<asp:DropDownList ID="DropDownList1" runat="server" AutoPostBack="True"
DataSourceID="SqlDataSource1" DataTextField="playerstyle"
DataValueField="playerstyle" AppendDataBoundItems="True">
<asp:ListItem Value="%">All</asp:ListItem>
</asp:DropDownList>
Ahora configuramos nuestro GridView con el data Source, el codigo sera asi:
<asp:GridView ID="GridView1" runat="server" AutoGenerateColumns="False"
BackColor="White" BorderColor="#CCCCCC" BorderStyle="None" BorderWidth="1px"
CellPadding="4" DataSourceID="SqlDataSource2" ForeColor="Black" GridLines="Horizontal" 
                AllowPaging="True">
                <Columns>
                    <asp:BoundField DataField="guitaristid" HeaderText="guitaristid"
InsertVisible="False" ReadOnly="True" SortExpression="guitaristid" />
                    <asp:BoundField DataField="playername" HeaderText="playername"
SortExpression="playername" />
                    <asp:BoundField DataField="playerstyle" HeaderText="playerstyle"
SortExpression="playerstyle" />
                    <asp:BoundField DataField="associatedacts" HeaderText="associatedacts"
SortExpression="associatedacts" />
                    <asp:BoundField DataField="famousperformance" HeaderText="famousperformance"
SortExpression="famousperformance" />
                </Columns>
                <FooterStyle BackColor="#CCCC99" ForeColor="Black" />
                <PagerStyle BackColor="White" ForeColor="Black" HorizontalAlign="Right" />
                <SelectedRowStyle BackColor="#CC3333" Font-Bold="True" ForeColor="White" />
                <HeaderStyle BackColor="#333333" Font-Bold="True" ForeColor="White" />
            </asp:GridView>
Si configuran todo bien les saldra como el ejemplo de arriba =)